PCR Genotyping Gel Analysis: Meet the Gel Analyzer
PCR Genotyping Gel Analysis: Meet the Gel Analyzer
Every PCR genotyping gel ends the same way. Someone holds the gel photo next to a sample sheet, counts lanes from the left, reads the bands, and types a genotype for each mouse into a spreadsheet or colony database. That last part is where PCR genotyping gel analysis quietly goes wrong. Counting off by one lane, putting a call on the wrong tag, or never entering the second gene doesn't look like an error on the day. It shows up weeks later as a breeder that doesn't throw the pups you planned for.
The new Gel Analyzer, now in beta in Moustra, goes after that handoff. You upload a photo of your gel. Moustra finds the lanes and marks the bands it sees, and you assign each lane to an animal from your colony. The genotypes you confirm are written straight onto those animal records. This post covers how it works, what it does and doesn't decide for you, and how to get clean results from your own gels.
Why gel-to-record transcription is the weak link in genotyping
Most labs have the wet-lab side of genotyping under control. The tail or ear biopsy, the digest, the PCR, the agarose gel and the imaging are all well-practiced protocols. The fragile step is the one with no protocol at all: getting from a picture to a row of data.
Here's what that step usually depends on:
- A lane map that lives somewhere else. The loading order is on a sticky note, a notebook page, or the back of a printout, and it has to be lined up by eye against the photo.
- Manual lane counting. With 15 or 20 lanes, a ladder, and a couple of blanks, it's easy to slip by one, especially when an empty well looks like a faint band.
- Retyping animal tags. Every tag is typed again, so every call is one typo away from the wrong mouse.
- Multi-gene lines. A conditional knockout might need a Cre gel, a floxed-allele gel, and a reporter gel. Each one is a separate chance to forget an entry.
None of this calls for more expertise. It calls for fewer places where a call can drift away from its lane. That's the problem the Gel Analyzer is built around.
What the Gel Analyzer does (and what it leaves to you)
Moustra has had gel tooling since 2025, when we introduced the original Gel Image Analyzer for tagging lanes by hand. The new Gel Analyzer is a rebuild. It now detects lanes automatically, works in a guided three-step flow (Image, Lanes, Review & submit), and writes confirmed genotypes into your colony in one submission.
It helps to be clear about how the work is split:
| Step | The Gel Analyzer | You |
|---|---|---|
| Finding lanes | Detects lane columns across one row of wells | Check the suggested lanes; add, drag, or remove any that are off |
| Reading bands | Marks the bands it detects in each lane with green lines | Decide whether a band is real product, a smear, or a primer dimer |
| Assigning samples | Lists the animals, genes, and alleles already in your lab | Pick the animal loaded in each lane |
| Making the call | Suggests an allele when a lane's bands match a lane you already called | Choose or confirm the genotype |
| Recording | Writes the ticked genotypes onto each animal and saves the gel images with the run | Review the table before submitting |
That split is deliberate. Band patterns depend on your primers, your ladder, and how your gel ran. A tool that silently made genotype calls would be wrong in exactly the cases you care about most. So the Gel Analyzer handles the mechanical parts (counting, aligning, matching, recording) and keeps the judgment with the person who knows the assay.
How to analyze a genotyping gel in Moustra, step by step
Open Gel Analyzer from the Animals menu (it carries a beta badge), then click How to use at any point for short clips of each step. The flow looks like this.
1. Select one row of lanes
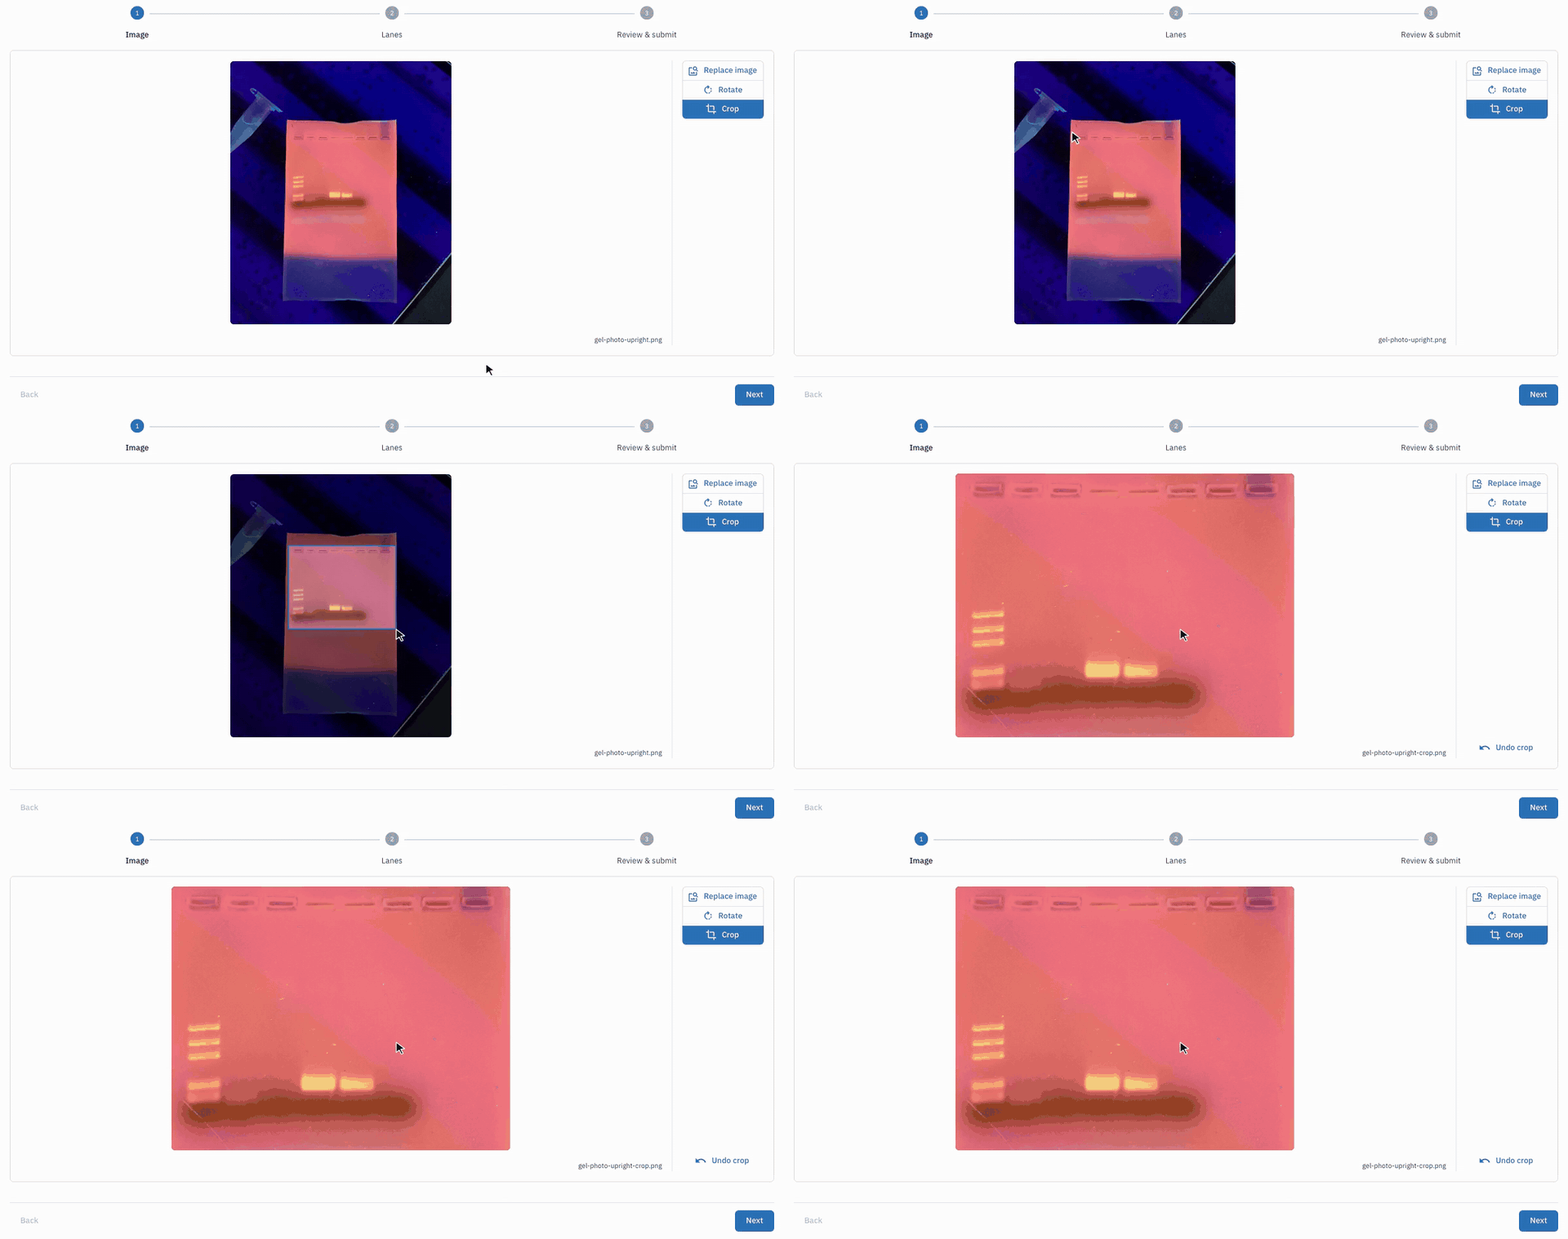
The analyzer reads one row of wells per image. If your gel has a single comb, crop to that row and its bands. If you ran two or three combs, crop and analyze each row separately.
When you crop, leave out rulers, handwritten labels, and the wells of the next row down. The bottom edge is the one people most often get wrong. A tight crop is the most effective thing you can do for good lane detection.
2. Prepare the image
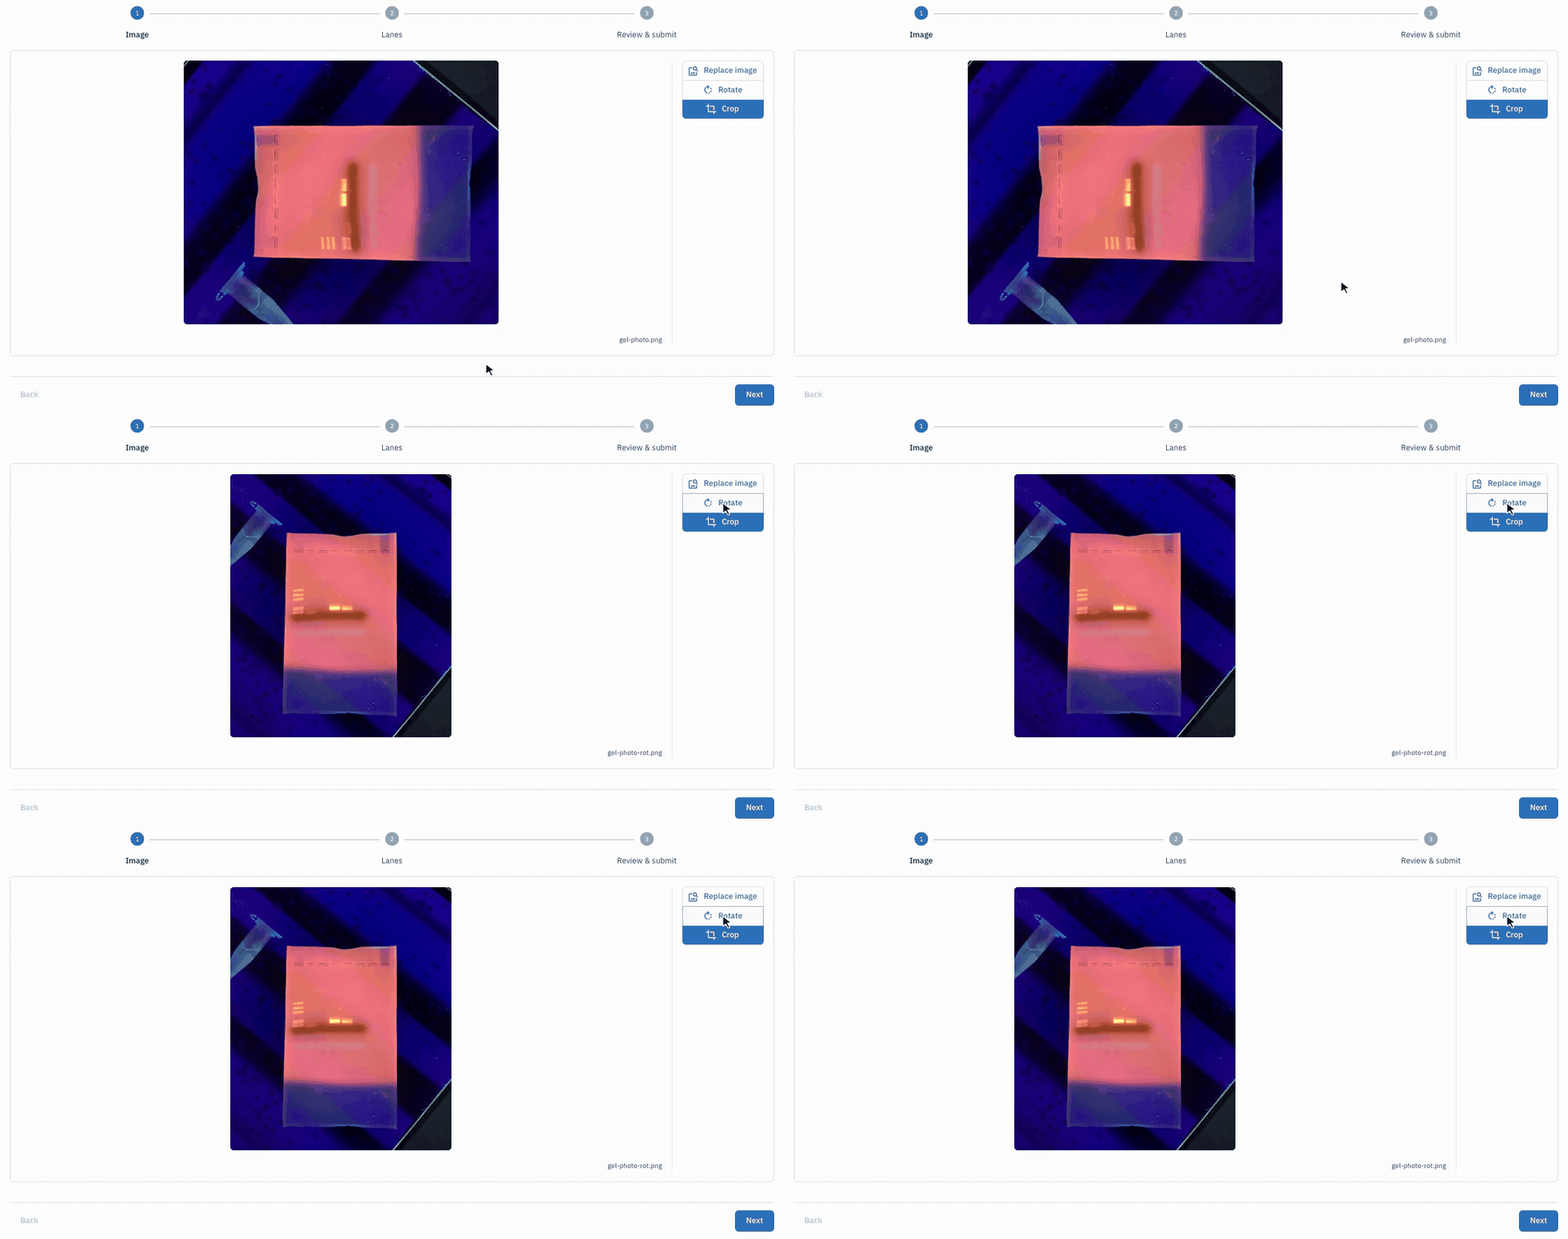
Rotate the image so the wells run along the top. Phone photos and some imagers save gels sideways, and lane detection expects wells at the top with bands running down. Upload a PNG or JPEG. Rotation works on both.
3. Set up lanes
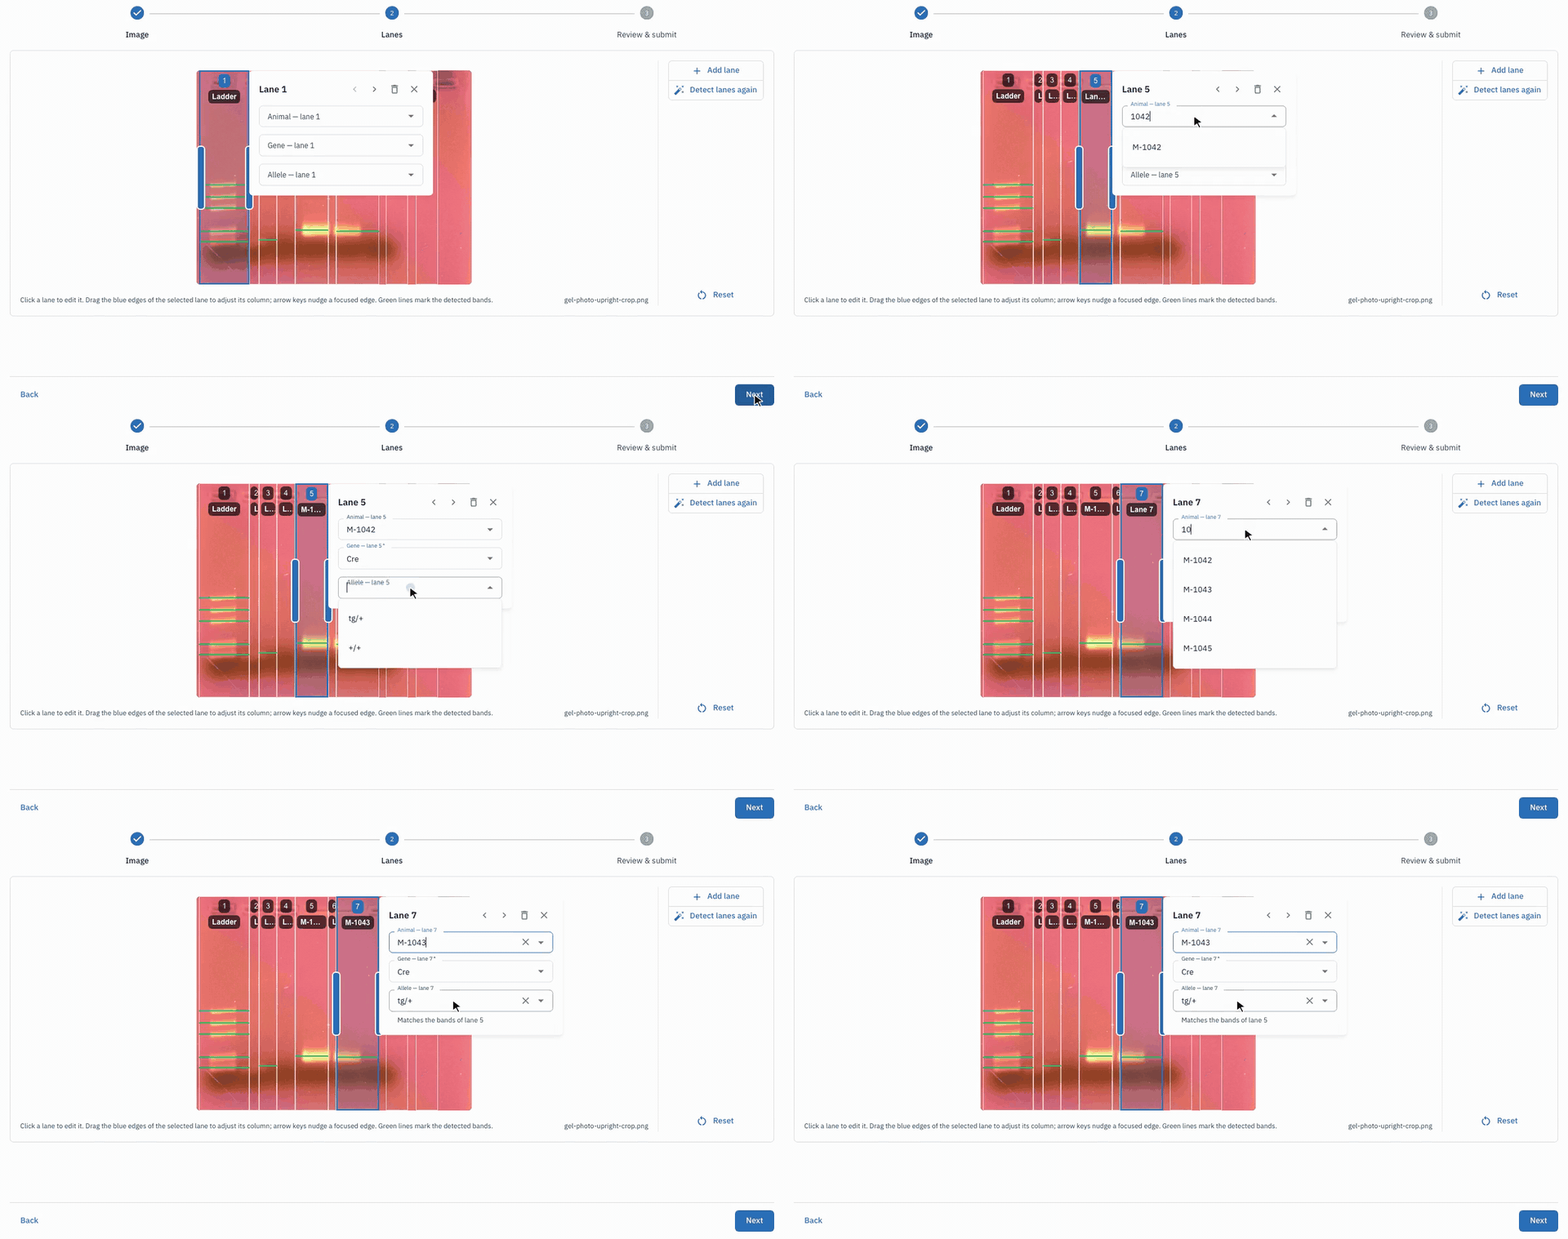
Moustra detects the lanes for you and draws a numbered box around each one. Click a lane to open its editor and choose:
- Animal: the mouse whose sample is in that well, picked from your colony
- Gene: the locus this gel tests
- Allele: your genotype call (optional at this point)
Once you've called one lane, the analyzer compares the bands in the other lanes against it. When a lane's bands line up with a lane you've already called, the allele field suggests the same call and notes "Matches the bands of lane 5", for example. On a gel with 12 heterozygotes and a handful of wild types, that saves a lot of repetitive picking. You still confirm each call.
Lanes you don't assign to an animal, such as the ladder, water blank, or positive control, are left out of the results automatically.
Treat suggested lanes as a draft. Faint or empty lanes can be missed, and labels or artifacts can occasionally be counted as lanes. You can drag the edges of any lane to fix its column, use Add lane for one that was missed, or click Detect lanes again after adjusting the image. A lane marked as inferred was placed from the comb spacing rather than from a visible band, so check it before assigning a sample.
4. Review and apply
The last step shows a table of every animal with its current genotype and the new one you're about to enter. Check the box next to each row you want to apply, then click Submit (the button shows the count, such as Submit 12 genotypes). Moustra writes those genotypes onto the animal records and saves the original and cropped gel images with the run.
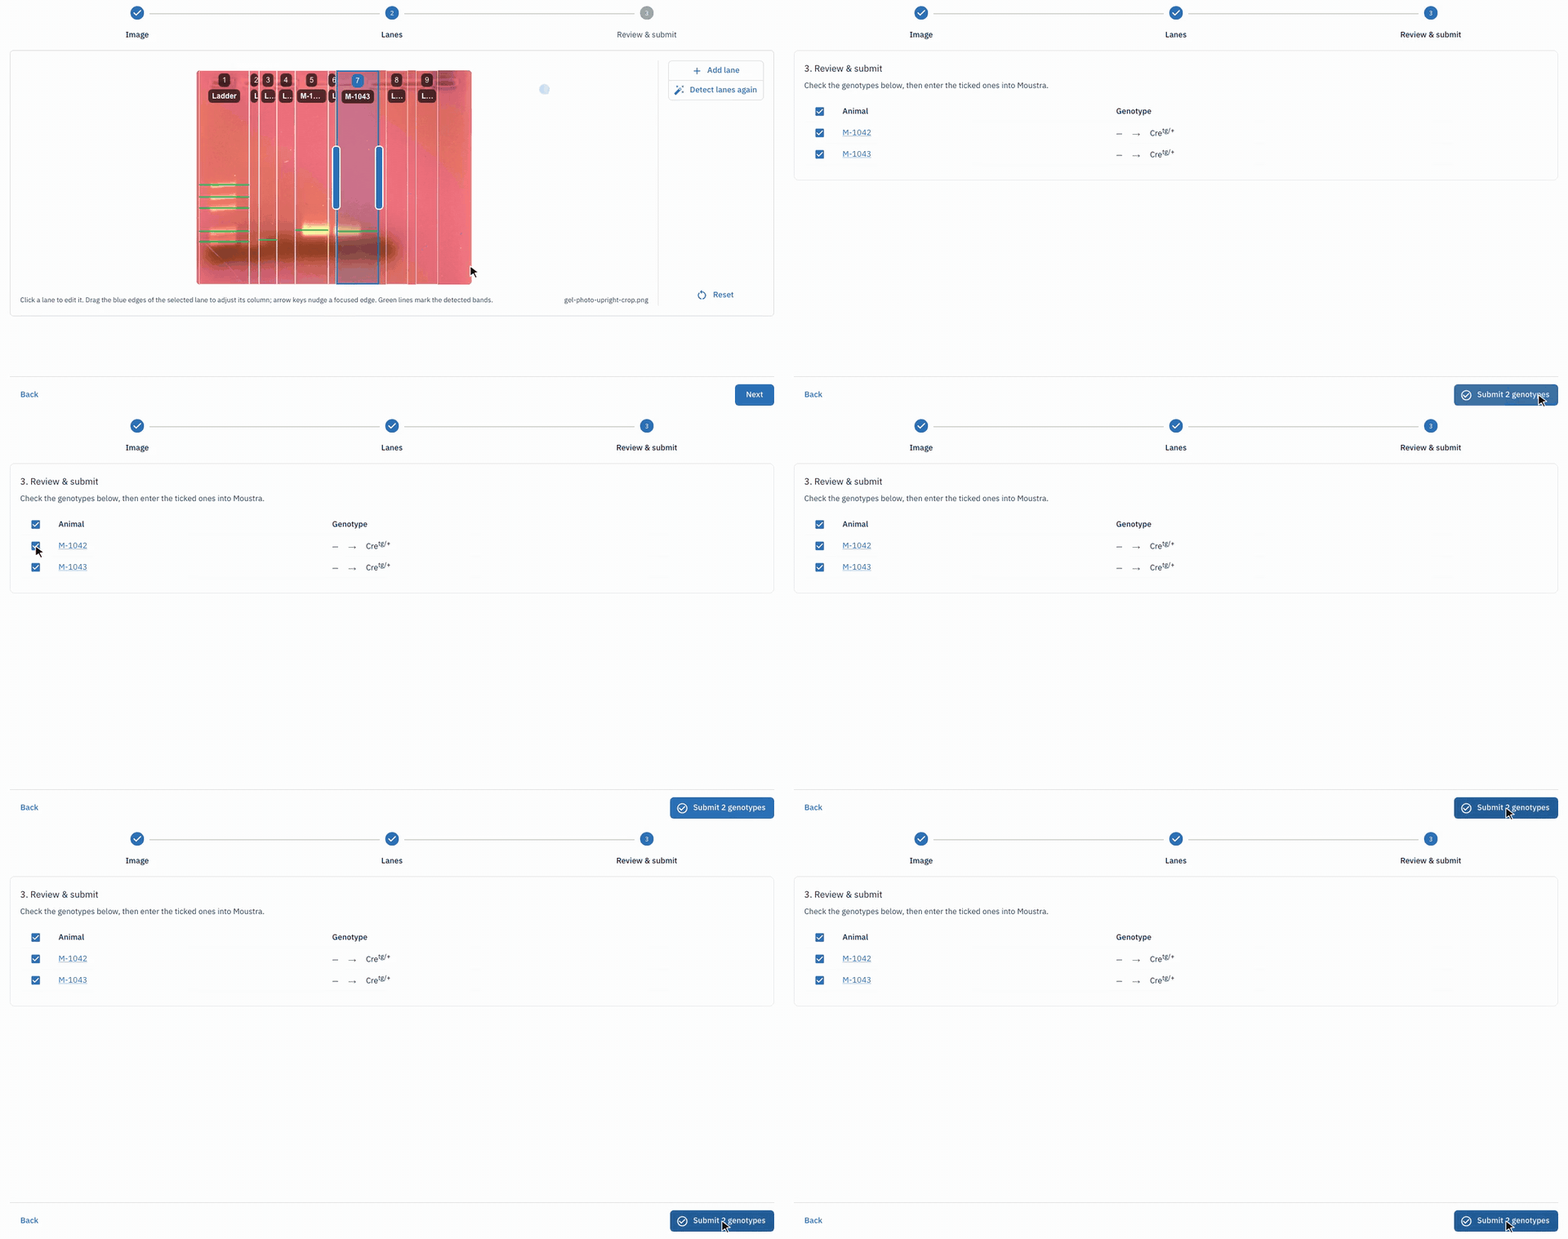
For the click-by-click version, see how to use the Gel Analyzer in the docs.
A checklist for gel images that analyze cleanly
Lane detection works best on images that would also be easy for a person to read. Before you upload, run through this list:
- One comb row per analysis. Crop multi-comb gels into separate images.
- Wells at the top. Rotate before moving on to lanes.
- Tight crop. Exclude rulers, tape, labels, and the next row's wells.
- Even spacing. Load samples in adjacent wells where you can. Gaps are fine, but expect to confirm the empty lanes.
- A ladder in a predictable position. Leave it unassigned so it stays out of the calls.
- Genes and alleles set up first. The analyzer offers the genes and alleles in your lab's lists, so add any new ones before you start. See how to manage genes and alleles.
- Resolution over filters. An unedited photo usually works better than one with heavy contrast or color adjustments.
If you're writing a new genotyping SOP, this list fits well in the imaging section.
Where this fits in your genotyping workflow
The Gel Analyzer replaces one step: turning a finished gel into recorded genotypes. Everything around it in Moustra stays the same. Tail-sample reminders still tell you which litters are due for biopsy. Genotypes entered from a gel show up on each animal's record next to any you enter by hand, and breeding and strain views use them like any other genotype.
That matters most for lines that need several gels per animal. Because each analysis records the gene it tested, a Cre gel on Monday and a floxed-allele gel on Wednesday both land on the same animals. You never have to merge two spreadsheets. For a broader look at structuring genotype data across strains and alleles, our complete guide to genotype management goes deeper.
What "beta" means here
The Gel Analyzer is labeled beta because lane detection is still learning from a wide range of real gels. Gel photos vary a lot: different imagers, stains, comb sizes, and phone cameras held at an angle. We'd rather show you the detected lanes and let you correct them than hide that behind a confident-looking result.
In practice, beta means:
- The workflow is stable. Genotypes you submit are real records, just like ones you enter by hand.
- Detection will improve. The gel images saved with each run help us find where detection struggles.
- Feedback directly shapes it. If a gel gives you trouble, tell us. Unusual gels are the most useful ones.
From gel photo to genotyped colony
PCR genotyping gel analysis has always had two halves: the science of reading bands, and the clerical work of recording them. The Gel Analyzer leaves the first half with you and takes over most of the second. Lanes are found for you, matching bands suggest matching calls, and the confirmed genotypes go onto the right animals in one submission, without retyping a single tag.
Picture the next litter you genotype: 14 pups and two genes. Normally that's an afternoon of lining up photos against a lane map. With the Gel Analyzer, you crop, check the lanes, pick the animals, and submit, and both gels end up on the right mice. If that sounds better than another round of spreadsheet transcription, give Moustra a try and run your next gel through the Gel Analyzer.